在WordPress中用程式的方法來修改WooCommerce的結帳欄位(新增自訂欄位或是刪除掉預設欄位)
1. 修改結帳欄位
使用到 woocommerce_checkout_fields 這個filter hook,hook上的function會接收到所有結帳欄位的資訊
以下為新增台灣手機號碼帳單欄位為例:
<?php
add_filter('woocommerce_checkout_fields', 'octopuswp_add_checkout_mobile_number');
/**
 * 新增台灣手機號碼,移除預設電話欄位
 * @params array $fields
 */
function octopuswp_add_checkout_mobile_number($fields)
{
    // 移除預設電話欄位
    // unset($fields['billing']['billing_phone']);
    /**
     * $fields記錄著所有的結帳欄位資訊
     * 這裡手機號碼欄位的key值使用billing_mobile_number
     */
    $fields['billing']['billing_mobile_number'] = [
        'text'     => 'text',  //欄位類型
        'label'    => '手機號碼', //標籤
        'required' => true, //必填
        'class'    => ['form-row-wide'] // 全寬欄位的class
    ];
    return $fields;
}
?>
$field的結構為
Array
(
    [billing] => Array
        (
            [billing_first_name] => Array
                (
                    [label] => 名字
                    [required] => 1
                    [class] => Array
                        (
                            [0] => form-row-wide
                        )

                    [autocomplete] => given-name
                    [priority] => 0
                )

            [billing_email] => ...
            [billing_country] => ...
            [billing_phone] => ...
        )

    [shipping] => Array
        (
            [shipping_first_name] => ...
            [shipping_last_name] => ...
            [shipping_company] => ...
            [shipping_country] => ...
            [shipping_address_1] => ...
            [shipping_address_2] => ...
            [shipping_city] => ...
            [shipping_state] => ...
            [shipping_postcode] => ...
        )

    [account] => Array
        (
            [account_username] => ...
            [account_password] => ...

        )

    [order] => Array
        (
            [order_comments] => ...

        )

)
為多層陣列結構,第一層依欄位群組分成
- billing(帳單資訊)
- shipping(運送資訊)
- account(帳號資訊)
- order(訂單其他資訊)
第二層開始紀錄的就是各欄位的詳細資訊了,第二層的key也是最後會寫進資料庫的key名稱,如key為billing_first_name,最後會寫進資料庫的meta_key就會是_billing_first_name
各個欄位的參數有
- id:html的id,預設為欄位的key值
- type:類型,預設為text,可接受的值有
country、state、textarea、checkbox、text、password、datetime、datetime-local、date、month、time、week、number、email、url、tel、select、radio - label:標籤名稱,會顯示在欄位上方
- description:補充說明
- placeholder:欄位內placeholder
- maxlength:html的maxlength屬性值
- required:是否必填
- autocomplete:html的autocomplete屬性值
- validate:驗證格式(陣列),可接受的值有,
postcode、email、phone、state - class:欄位的容器class(陣列)
在結帳欄位中欄位(input、select)及label會被包上一個p標籤容器,class預設可控制這個欄位的排列方式
控制排列方式的class有form-row-wide(全寬)、form-row-first(左欄)、form-row-last(右欄)
也可帶入自訂的class名稱 - label_class:label的class(陣列)
- input_class:欄位的class(陣列)
- options:選項(陣列),若欄位為select或radio,則須帶入
- custom_attributes:其他自訂的html屬性(陣列)
- default:預設值,當使用者第一次結帳時的值
- autofocus:html的autofocus屬性值
欄位資訊最後會透過woocommerce_form_field這個function來產生html,詳細用法請參考
2. 將自訂的結帳欄位顯示在感謝頁面
感謝頁面的hook有很多,依照想顯示出來的地方挑選一個即可(參考woocommerce/tamplates/checkout/thankyou.php),這裡使用woocommerce_before_thankyou這個action hook
範例:
add_action('woocommerce_before_thankyou', 'octopuswp_show_mobile_number_in_thankyou');
/**
 * 將結帳時手機號碼資料顯示在感謝頁面
 * @param int $order_id 訂單ID
 */
function octopuswp_show_mobile_number_in_thankyou($order_id)
{
    $order = wc_get_order($order_id);
    echo '<p>手機號碼:' . $order->get_meta('_billing_mobile_number') . '</p>'; // echo出html結構
}
呈現的效果如下:

但這樣看起來怪怪的,因為手機號碼須融入原有感謝頁面的資訊才對,注意到下面有個區塊是顯示帳單資訊的

經查他是透過WC_Order::get_formatted_billing_address這個method產出的html,這是WooCommerce拿來顯示格式化帳單資料html的方法,他會根據不同的國家而有不一樣的顯示方式
而這裡修改的方法有兩種:
第一種是比較遵守遊戲規則,遵照修改格式資料的方式,修改html的顯示格式,讓WooCommerce自己依照格式將資料塞入產出html,範例如下:
參考WC_Countries::get_formatted_address,先修改台灣的html格式,格式預設是定義在WC_Countries::get_address_formats,最後會經過woocommerce_localisation_address_formats這個filter hook
add_filter('woocommerce_localisation_address_formats', 'octopuswp_override_tw_address_format');
/**
 * 修改台灣地址格式
 * @param array $formats
 * @return array mixed
 */
function octopuswp_override_tw_address_format($formats)
{
    $default_tw_address_format = $formats['TW'];
    // 預設的台灣地區地址格式資料,這裡有許多格式字串,WooCommerce會再取代成真正的資料
    // {company}\n{last_name} {first_name}\n{address_1}\n{address_2}\n{state}, {city} {postcode}\n{country}
    // 在這裡把它放在country的後面,所以直接append上去就好,格式字串自訂
    $formats['TW'] = $default_tw_address_format . "\n{mobile_number}";
    return $formats;
}
接著資料本身是會透過WC_Order::get_address('billing')來傳入,透過woocommerce_get_order_address這個filter hook來將儲存的手機號碼資料加入
add_filter('woocommerce_get_order_address', 'octopuswp_add_order_address_data', 10, 3);
/**
 * 將手機號碼加入地址資料
 * @param array $data 地址資料
 * @param string $type 帳單或運送
 * @param WC_Order $order
 * @return array
 */
function octopuswp_add_order_address_data($data, $type, $order)
{
    // 只有加入帳單的資料
    if('billing' == $type) {
        $data['mobile_number'] = $order->get_meta('_billing_mobile_number');
    }
    return $data;
}
再來就是定義自訂格式字串{mobile_number}要被取代成什麼資料
add_filter('woocommerce_formatted_address_replacements', 'octopuswp_add_address_format_replacement', 10, 2);
/**
 * 加入自訂格式字串的陣列取代資料
 * @param array $replacements 要取代的字串對應陣列
 * @param array $data 地址資料
 * @return mixed
 */
function octopuswp_add_address_format_replacement($replacements, $data)
{
    // 因為在這裡只加入帳單(billing)的手機號碼欄位,沒有運送(shipping)的手機欄位
    // 而透過woocommerce_localisation_address_formats修改格式的話沒有辦法去區別是billing還是shipping
    // 且上一步octopuswp_add_order_address_data只加入billing的資料
    // 所以在這裡就要判斷是否有這個資料存在
    $replacements['{mobile_number}'] = !empty($data['mobile_number']) ? $data['mobile_number'] : '';
    return $replacements;
}
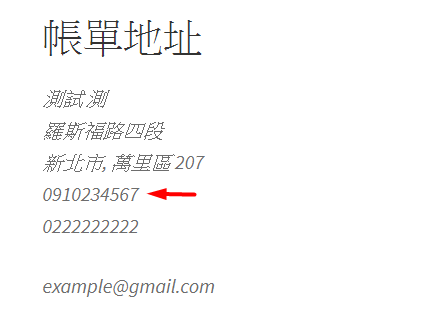
效果如下:
第二種是直接修改WC_Order::get_formatted_billing_address產出的html,透過woocommerce_order_get_formatted_billing_address這個filter hook
add_filter('woocommerce_order_get_formatted_billing_address', 'octopuswp_add_mobile_number_to_formatted_address_html', 10, 3);
/**
 * 將自訂欄位資料加入到formatted address的html
 * @param string $formatted_address_html
 * @param array $address_data
 * @param WC_Order $order
 * @return string
 */
function octopuswp_add_mobile_number_to_formatted_address_html($formatted_address_html, $address_data, $order)
{
    $formatted_address_html .= $order->get_meta('_billing_mobile_number');
    return $formatted_address_html;
}
3. 將自訂的結帳欄位顯示在後台
後台訂單頁面,預設有個區塊是拿來顯示結帳欄位資訊的

可以使用woocommerce_admin_billing_fields及woocommerce_admin_shipping_fields來將自訂的欄位加進去
add_filter('woocommerce_admin_billing_fields', 'octopuswp_add_admin_billing_fields');
/**
 * 加入自訂欄位資料到後台定單頁面
 * @param array $fields
 */
function octopuswp_add_admin_billing_fields($fields)
{
    // 這裡的key -> mobile_number,會讓woocommerce自己去抓取結帳欄位key為billing_mobile_number的資料
    // 所以只要填入mobile_number就好,不用填入完整的billing_mobile_number
    $fields['mobile_number'] = [
        'label' => '手機號碼', // 欄位標籤
        'show' => true //再沒有按下編輯按鈕時,是否顯示出來,預設為true
    ];
    return $fields;
}
這裡的欄位參數也提供了type、options、class可填,type預設為text